So here we have it.
The finished product. I've not added a major amount to this since the last post. Mainly a bit of light touching up and the application of some Tamiya Clear Red to the wounds.
Once again, I'd emphasise how awesome this kit has been to work with - I'd definitely do one of these again, but maybe try and push the modelling element a bit further. I reckon starting over from scratch that I could definitely produce something more disgusting than this...
Showing posts with label weathering powders. Show all posts
Thursday, 20 March 2014
Monday, 10 March 2014
Blight Drone (work in progress)
Well over a year ago, I bought the amazing Blight Drone kit from Forge World, and over the last week or so, I've finally gotten around to getting some paint on it. I've still got a considerable way to go to get this beast finished, but I thought I'd share what I've done so far.
I think for a while I'd been worried about accidentally trashing this amazing kit by doing a poor paint job on it. That's why it had remained untouched for so long.
Once I got into the swing of this, I decided to do something else I'd been putting off for ages. Using the Vallejo weathering pigments I'd bought over 2 years ago. Again, I'd been terrified of wrecking a cherished model by messing up in the application of this stuff. I'd had no idea how to use them, and incredibly, didn't even bother looking at any tutorials. I'm an idiot. This stuff is really, really simple to use, and great fun to mess about with. Truly I am fool of preposterous proportions (disclaimer: Tony of Nurgle is by no means bloated or fat).
This is an airbrushed base coat washed with Typhus
Corrosion
|
The "slug" part is a coat of Russian Green primer and
a further coat of Duck Egg applied by airbrush, then
washed with my "murk" mix
|
Natural light |
more natural light |
The flash here shows the varying layers of pigment. It looks less crap in
natural light, though
|
More flash illumination
|
Friday, 17 February 2012
Powders of dubious repute...
![]() |
I nearly shat myself. Maelstrom managed to send something 2nd class and it arrived a day later. |
![]() |
And these be the colours. I'll be using them for the bases on my models, and also on the tanks. |
Saturday, 4 February 2012
Test pieces and musings
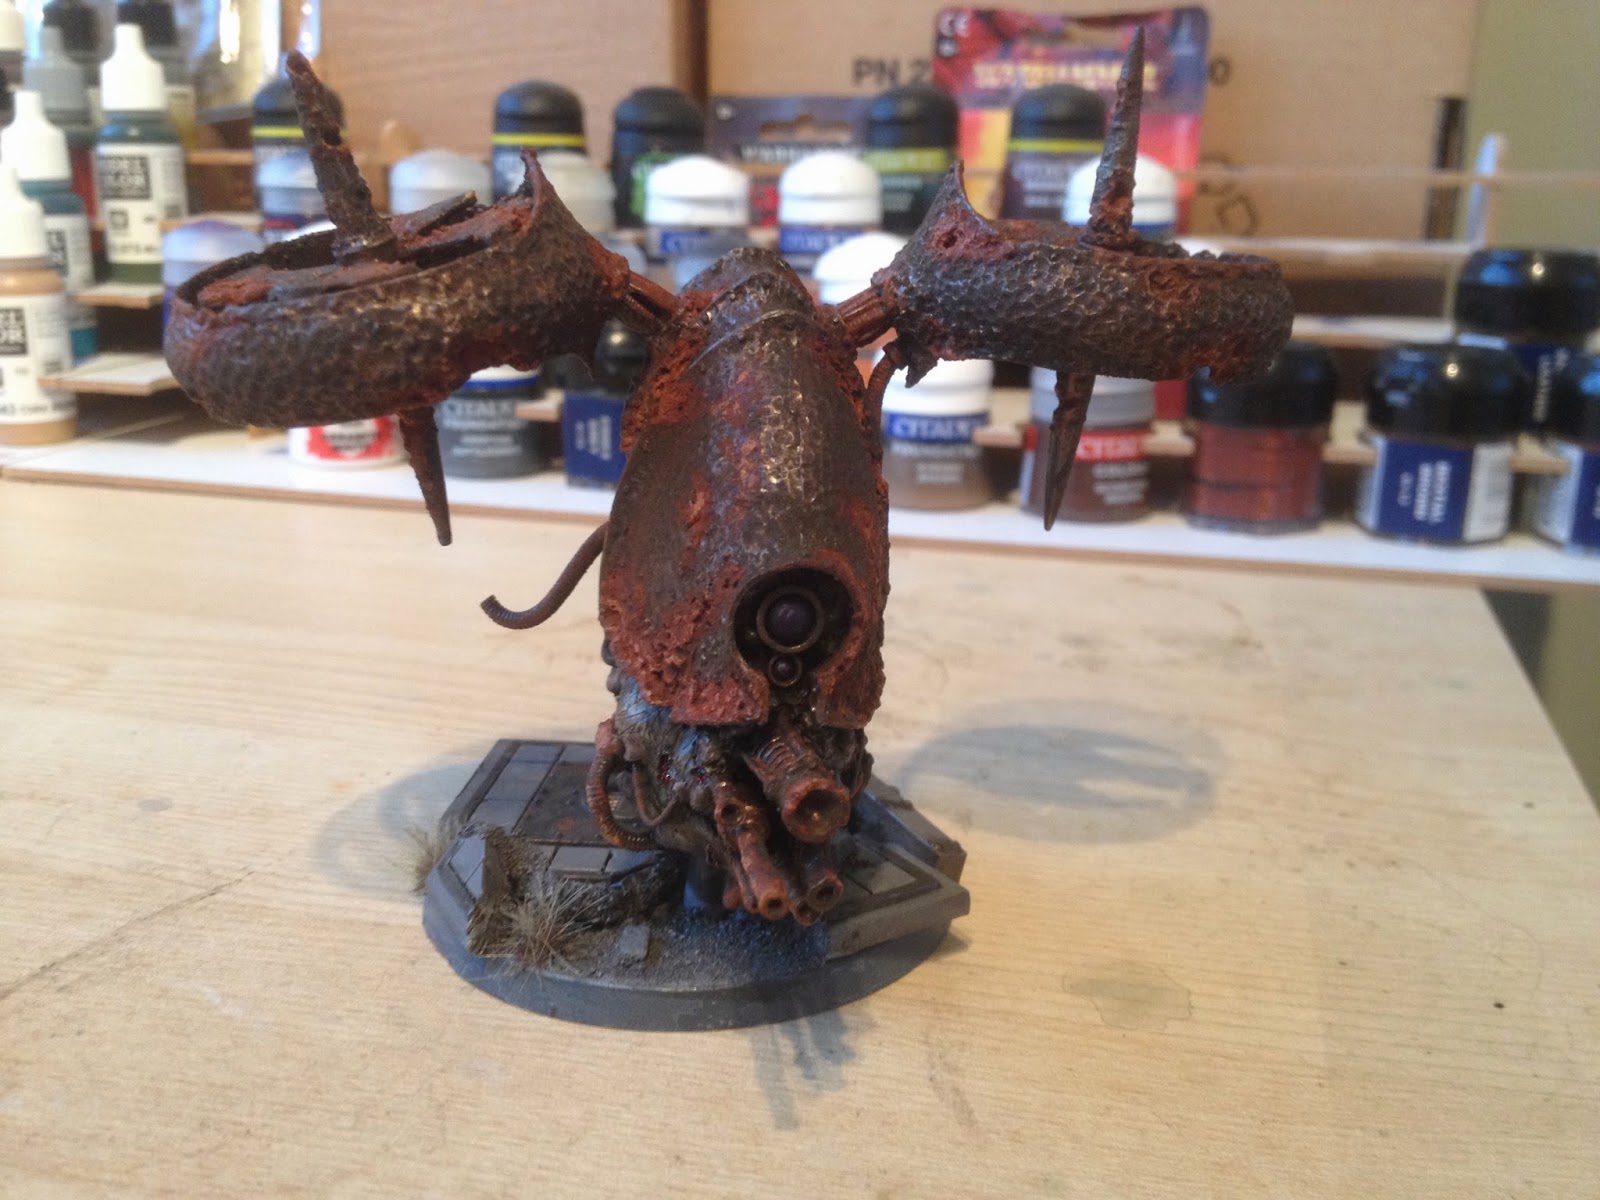
My original colour scheme test piece for the Death Guard is the torso of a chaos terminator. |
After loads of discussion awhile back with my mate Tim (thanks Tim) over a fair few pints of ale in our usual drinking den, I decided to do a few test schemes based around using off-white as the main colour. It seemed sensible to test out the scheme on some spare parts from kits I was likely to use in the future.
The off-white was achieved from a base coat of the Dheneb Stone foundation paint that GW make, which was then worked up lighter by adding in Vallejo Off White in increasing proportions.
The green started off from a base coat of Knarloc Green, which in subsequent coats was worked up to the mouldy fruit type level by adding in increasing amounts of Dheneb Stone.
Throughout this process, there were also several stages of washes over the entire piece, of Devlan Mud, Thraka Green and a mixture of the two.
I think the contrast works pretty well, here. The build up of grime seems to add some real depth.
* * *
Last night, I had another pub discussion with Tim over several pints of Grumpling Ale, which I strongly suggest you seek out, as it's properly awesome, and the chances are it's one of the reasons drinking was invented in the first place. I'll skim over the bit about the belligerent Spanish lesbians (no offence to Spanish lesbians intended, I'm sure the majority of you are not belligerent) that seemed to be trying to pick-pocket folk and were also in possession of a coil of some fairly heavy duty tubing. Weird.
Anyway. In this discussion, we were talking about colour theory, and I've decided to do a few more test pieces based around the existing Death Guard scheme to see if I can manage to get any extra contrast to come out in the paint job. I think we've also cracked the conundrum of what I should be using as a minimal spot colour, and how I should apply it. If it works out, I'll put some pics up in the near future.
The conclusion to another conundrum has also been reached. I'd been wondering how to work on the resin bases I'm using, and it seems the way forward may be to use some kind of weathering powders. Which are something I've never used before, and I'm quite nervous/excited about...
Subscribe to:
Posts (Atom)